PMD is very nice Java code scanner which helps you avoid potential programming problems. It can be easily extended to your needs, and this post will bring you simple example of custom PMD rules related to JPA's
@Enumerated annotation usage.
Before you'll continue the reading, you should check one of my previous posts -
JPA - @Enumerated default attribute. When you work with the group of people on JPA project, it is almost certain that one of the developers will use
@Enumerated annotation without defining the
EnumType, and if you don't use strict data validation on the DB level (like column level constraints), you will fall into deep troubles.
What we would like to achieve is reporting an error when one uses
@Enumerated without the
EnumType:
@Entity
@Table(name = "BENEFITS")
public class Benefit implements Serializable {
    ...
    @Column(name = "BENEFIT_TYPE")
    @Enumerated
    public BenefitType getType() {
        return type;
    }
    ...
}
and a warning if one uses
@Enumerated with ORDINAL
EnumType:
@Entity
@Table(name = "BENEFITS")
public class Benefit implements Serializable {
    ...
    @Column(name = "BENEFIT_TYPE")
    @Enumerated(EnumType.ORDINAL)
    public BenefitType getType() {
        return type;
    }
    ...
}
We can achieve our goal in two ways, either describing the PMD Rule in Java, or using
XPath - I'll focus on the second way in this post.
Let's start from the beginning ;) - we have to
download PMD first (I used version 4.2.5,
pmd-bin-4.2.5.zip), unpack it somewhere, change the working directory to the unpacked PMD directory, and run the Rule Designer (it can be found in
./bin/designer.sh). You should see something like this:
Let's put the code we want to analyze into the source code panel, and click "Go" button:
In the middle of Abstract Syntax Tree panel you may see: Annotation / MarkerAnnotation / Name structure corresponding to our
@Enumerated annotation without defined
EnumType. To match it we will put into XPath Query panel following XPath expression:
//MarkerAnnotation/Name[@Image = 'Enumerated']
When you click on the "Go" button now:
you will see at the bottom right panel that the match was found :) - XPath Query is correct :).
Now when we have the XPath Query we have to define the rule using it, let's open new XML file, name it
jpa-ruleset.xml, and put into it:
<ruleset name="JPA ruleset"
    xmlns="http://pmd.sf.net/ruleset/1.0.0" xmlns:xsi="http://www.w3.org/2001/XMLSchema-instance"
    xsi:schemaLocation="http://pmd.sf.net/ruleset/1.0.0 http://pmd.sf.net/ruleset_xml_schema.xsd"
    xsi:noNamespaceSchemaLocation="http://pmd.sf.net/ruleset_xml_schema.xsd">
    <description>JPA ruleset</description>
    <rule name="AvoidDefaultEnumeratedValue" message="By default @Enumerated will use the ordinal." class="net.sourceforge.pmd.rules.XPathRule">
        <priority>2</priority>
        <properties>
            <property name="xpath" value="//MarkerAnnotation/Name[@Image = 'Enumerated']" />
        </properties>
    </rule>
</ruleset>
As you see we are using
net.sourceforge.pmd.rules.XPathRule as the rule class, and define
xpath property for this rule holding our XPath Query. Priority in the above example means: 1 - error, high priority, 2 - error, normal priority, 3 - warning, high priority, 4 - warning, normal priority and 5 - information.
We will add another rule to our JPA ruleset, responsible for reporting a warning when
@Enumerated is used with explicit ORDINAL
EnumType - it can be either
@Enumerated(EnumType.ORDINAL) or
@Enumerated(value = EnumType.ORDINAL), therefore we need an alternative of two XPath expressions now:
<rule name="EnumeratedAsOrdinal" message="Enumeration constants shouldn''t be persisted using ordinal." class="net.sourceforge.pmd.rules.XPathRule">
        <priority>4</priority>
        <properties>
            <property name="xpath" value="
                //SingleMemberAnnotation/Name[@Image = 'Enumerated']/following-sibling::MemberValue//Name[@Image = 'EnumType.ORDINAL'] |
                //NormalAnnotation/Name[@Image = 'Enumerated']/following-sibling::MemberValuePairs/MemberValuePair[@Image = 'value']//Name[@Image = 'EnumType.ORDINAL']" />
        </properties>
    </rule>
Now, when we have ruleset holding those two rules, we will import it into Eclipse IDE. At this point I'm assuming that you have already installed PMD plugin for Eclipse (see:
PMD - Integrations with IDEs).
Open Eclipse Preferences, find the PMD section and expand it, you should see:
click on "Import rule set ..."
select the file holding the ruleset, choose if you want to import it by reference or copy (in this case your ruleset name will be ignored and '
pmd-eclipse' name will be used), and you should see our two rules added to the list:
Perform the necessary build when asked by eclipse, and before you'll start enjoying our new rules, check the project properties:
"Enable PMD" option should be turned on to let PMD check your code on-the-fly, our newly added rules should be active for this project (they will be by default).
Let's write some "bad code" now, matching the first rule defined by us:
When you point the red marker on the left with your mouse you will see the rule message, as defined in XML:
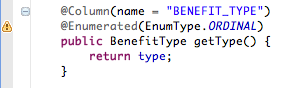
The second rule matching:
and the message, as defined in XML:
Few links for the dessert: